Table of Contents
MARC Report 253: Title List view
In MARC Report version 253, a number of changes were made to the Title List View. The main purpose of these changes is to resolve some ambiguities regarding filtering and how it is applied.
In the documentation for this view, and in the program itself to some degree, the term “selecting” was being conflated with “filtering”. To remedy this, the Help file for this section was completely re-written; the relevant passages are quoted below.
To further clarify the issue, the button named “Apply selection” (at the bottom of the view) was removed; in its place now are two checkboxes, named “Apply Filter” and “Apply Selection”, respectively.
- 'Apply filter': only records included by a filter will be navigable in the Edit session.
- 'Apply selection': only records selected by the user will be navigable in the Edit session.
Of course, if there is no filter, or if no records are selected, then all records will be navigable in the Edit session. (To learn about what is meant by “filter” and “selection”, please read the Help section below).
Title List Help
SELECTING
Click on a row in the Title list view to select it.
When you select a row in the Title list view, the other views (MARC View, Text View, Xml View, etc.) immediately navigate to the selected record.
To select multiple rows use the same keystrokes as you would in any Windows list:
- to pick out individual rows, hold down <Ctrl> then click each row
- to select consecutive rows, click on the first row, hold down <Shift>, click on the last row
When you select multiple rows in the Title list view, the other views (MARC View, Text View, Xml View, etc.) will navigate to the last record in the selection.
FILTERING
Unlike “Selecting” (above), “Filtering” physically removes rows from the view.
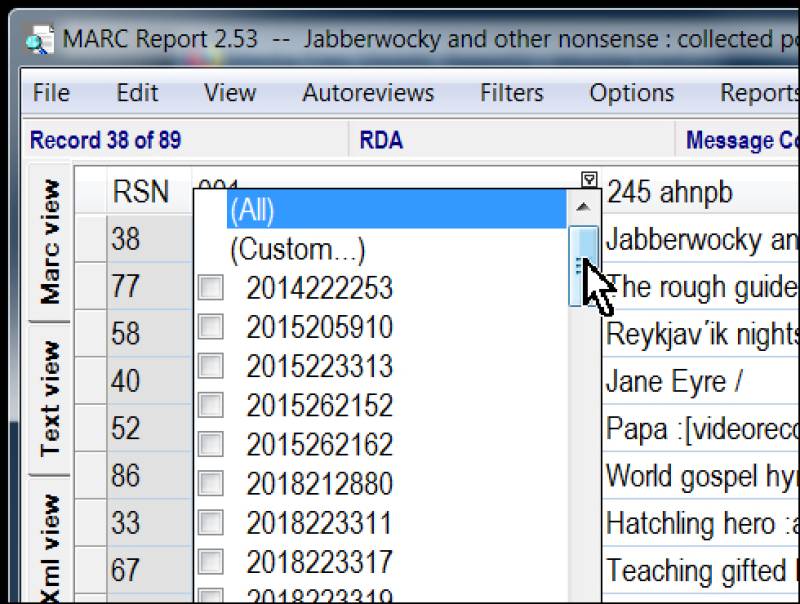
To set a filter on a column, hover the mouse over the column header and click on the (very small) filter icon that appears in the top right.
A list of unique strings present in the column will appear.
Check the strings that you want to include. Note that filtering does not “select” records.
Alternately, when the list of strings appears, click '(Custom …)' at the top of the list to open the 'Filter builder' dialog.
Here you can construct patterns to match the strings in the column:
Once you press 'OK' on the Custom Filter form, the filter pattern will display in a special dark grey panel at the top of the view.
At that point, any row that does not match your filter criteria will be removed from the view.
Click the red [x] (top left) on the Filter information panel to delete the filter (restores all rows to the view).
Click the checkbox (next to the red [x]) to restore all rows to the view without deleting the filter criteria–this option keeps the filter intact: re-selecting the checkbox will re-apply the filter, and you can still make changes to the filter by pressing the 'Customize' button on the far right (not pictured).
Edit Session Integration
The title list view is not only a summary of the current MARC file; you can also use this view to navigate through the file in the other views of the Edit session.
At the bottom of the Title list view are two 'Apply' check buttons: 'Apply filter' and 'Apply selection'.
When you press 'Apply selection', only the records that are selected will be navigable in the Edit session.
When you press 'Apply filter', only the records that are selected by the filter will be navigable in the Edit session.
Example
Create a title list, then click on any row but the first. Click on the 'MARC' view tab. The view will display the MARC record corresponding to the title list row that was clicked on. Still in the MARC view, press a navigation button at the bottom–notice that navigation resumes normally from the clicked-on record.
Now go back to the Title list view and press 'Apply selection'. Return to the MARC view and press the forward or backward navigation button. A message will pop up saying that no more records are available in that direction–this is because only one record–the one that you originally clicked on–is selected, and this selection has been “applied” to the Edit session.
Finally, from the main menu, select 'Filters|Title list|Clear filter' (or press Ctrl-Alt-L). Still in the MARC view, again press a navigation button at the bottom–notice that navigation now resumes normally from the selected record.
Another way to clear a selection or a filter is simply to return to the Title List view and uncheck the checkbox in the corresponding “Apply” button.
Notes
Its important to note that applying either a selection or a filter has no effect on the Edit session's MARC file–all of the records in the file remain in the file even when you cannot navigate to them.
To reassure yourself of this, practise the example above: select/filter records, apply the selection/filter, switch to MARC view, navigate through the available records, then clear the filter: all records in the file will again be navigable.
Technically, when 'Apply selection' is pressed, the program creates a custom filter based on the selected records and applies it to Edit session navigation. For this reason, when a selection is 'applied', some of the program prompts may refer to it as a 'filter'.
It is not possible to apply both a selection and a filter at the same time.
![[MARC Report]](/w/lib/tpl/dokubook/images/logo.jpg)


